How to Enable Performance in windows !0 TO play high end games
Ultimate Performance mode is now available for devices with Windows 10 April 2018 Update newer. Microsoft says that its new Ultimate Performance mode is a power scheme and it’s basically designed for use on high-end PCs.
Ultimate Performance power scheme is for users who need to squeeze every ounce of performance out of their machines.
The feature is available in Windows 10 Pro for Workstations and it has been created for users with high-performance workstations, but you can enable it on any device.
In this Windows 10 guide, you’ll learn steps to enable Ultimate Performance mode in Windows 10.
What is Ultimate Performance Mode in Windows 10?
Microsoft is rolling out the Ultimate Performance Mode in Windows 10 for workstations and it aims to optimize the performance of the operating system.
Microsoft has disabled the feature on battery-powered devices such as laptops and it officially works only with Windows 10 Pro for Workstations.
On laptops, you might not see the Ultimate Performance plan in Control Panel. If you don’t, you should be able to enable it manually with a command in standard Command Prompt or PowerShell command.
It’s worth noting that if you turn it on a laptop or some desktops, it might result in excessive power usage and it will negatively affect the battery backup.
Ultimate Performance will make attempts to eliminate micro-latencies and it will force the system to use more power than required, which is why Microsoft is not enabling it on battery-powered systems.
According to Microsoft, Ultimate Performance will make the following changes to your system:
- Hard Disk is never turned off.
- It sets Java timer frequency to Maximum performance.
- Wireless Adapter Settings is set to Maximum Performance.
- Turns off sleep mode for Hard disk.
- Hibernation is turned off.
- It sets Processor power management to 100%.
- The display will turn off only after 15 minutes of non-activity.
- Quality of video playback is optimized.
If you care more about performance than the battery backup of your laptop, here’s what you need to do to enable the Ultimate Performance mode in Windows 10.
Enable Ultimate Performance Mode in Windows 10
To enable Ultimate Performance mode in Windows 10, follow these steps:
- Search for Command Prompt in the Start menu.
- Right-click the Command Prompt result.
- Choose “Run As Administrator.”
- In Command Prompt window, type the following command:
- powercfg -duplicatescheme e9a42b02-d5df-448d-aa00-03f14749eb61
- Press Enter.
- Reboot the system.
- Open Settings and navigate to System > Power & sleep > Additional Power Settings.
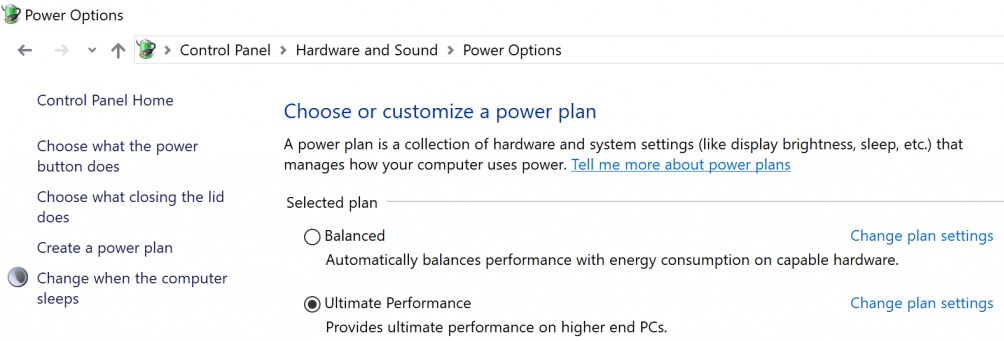
- Under ‘Choose or customize a power plan’, select ‘Ultimate Performance’.
Once enabled, you’ll see a new power scheme in Control Panel > Hardware and Sound > Options.

Windows 10 has three different power plans, namely Balanced, Power Saver and High Performance. By default, “Balanced” power plan would be enabled to balance your computer’s performance with energy consumption.
If you select Ultimate Performance as your default power plan, Windows will prioritize performance over energy efficiency.
If you don’t like the Ultimate Performance power plan, you can always disable it by reverting the changes that you just made.
Disable Ultimate Performance Mode in Windows 10
- Launch Settings from Cortana/Search.
- In Settings, navigate to System -> Power & Sleep, and click ‘Advanced Power Settings’ link.
- Under ‘Choose or customize a power plan screen, switch to ‘Balanced Mode’.
- Click on ‘Change plan settings’ link next to Ultimate Performance, and click on delete option.
Microsoft says that the Ultimate Performance power scheme is available for everyone with Windows 10 April 2018 Update (version 1803) or newer.
On officially supported devices, OEMs/PC manufacturer will enable the feature by default.

Comments
Post a Comment